

How to Iron On a Patch (Step-by-Step Guide for Clothes, Hats, Backpacks & More)
How to Iron On a Patch (Step-by-Step Guide for Clothes, Hats, Backpacks & More)
Custom Iron-on Patches are one of the easiest ways to upgrade your clothing, repair fabric, or personalize items like jackets, backpacks, and hats. Whether you're working with custom embroidered patches, plastic backing, or different fabrics like polyester or denim, this guide covers everything you need to know.
What Is an Iron-On Patch?
An iron-on patch comes with a heat-activated adhesive backing (usually plastic) that melts when heated and bonds to fabric. This eliminates the need for sewing, making it quick, beginner-friendly, and durable when applied correctly and durable when applied correctly. This process is easier than ever when you get the patches by Patch Makers Hub.
How to Tell If a Patch Is Iron-On
- Look for a shiny or plastic backing
- Product description mentions “heat seal” or “iron-on”
- Slightly stiff back compared to sew-on patches
If it doesn’t have adhesive backing, it’s not iron-on.
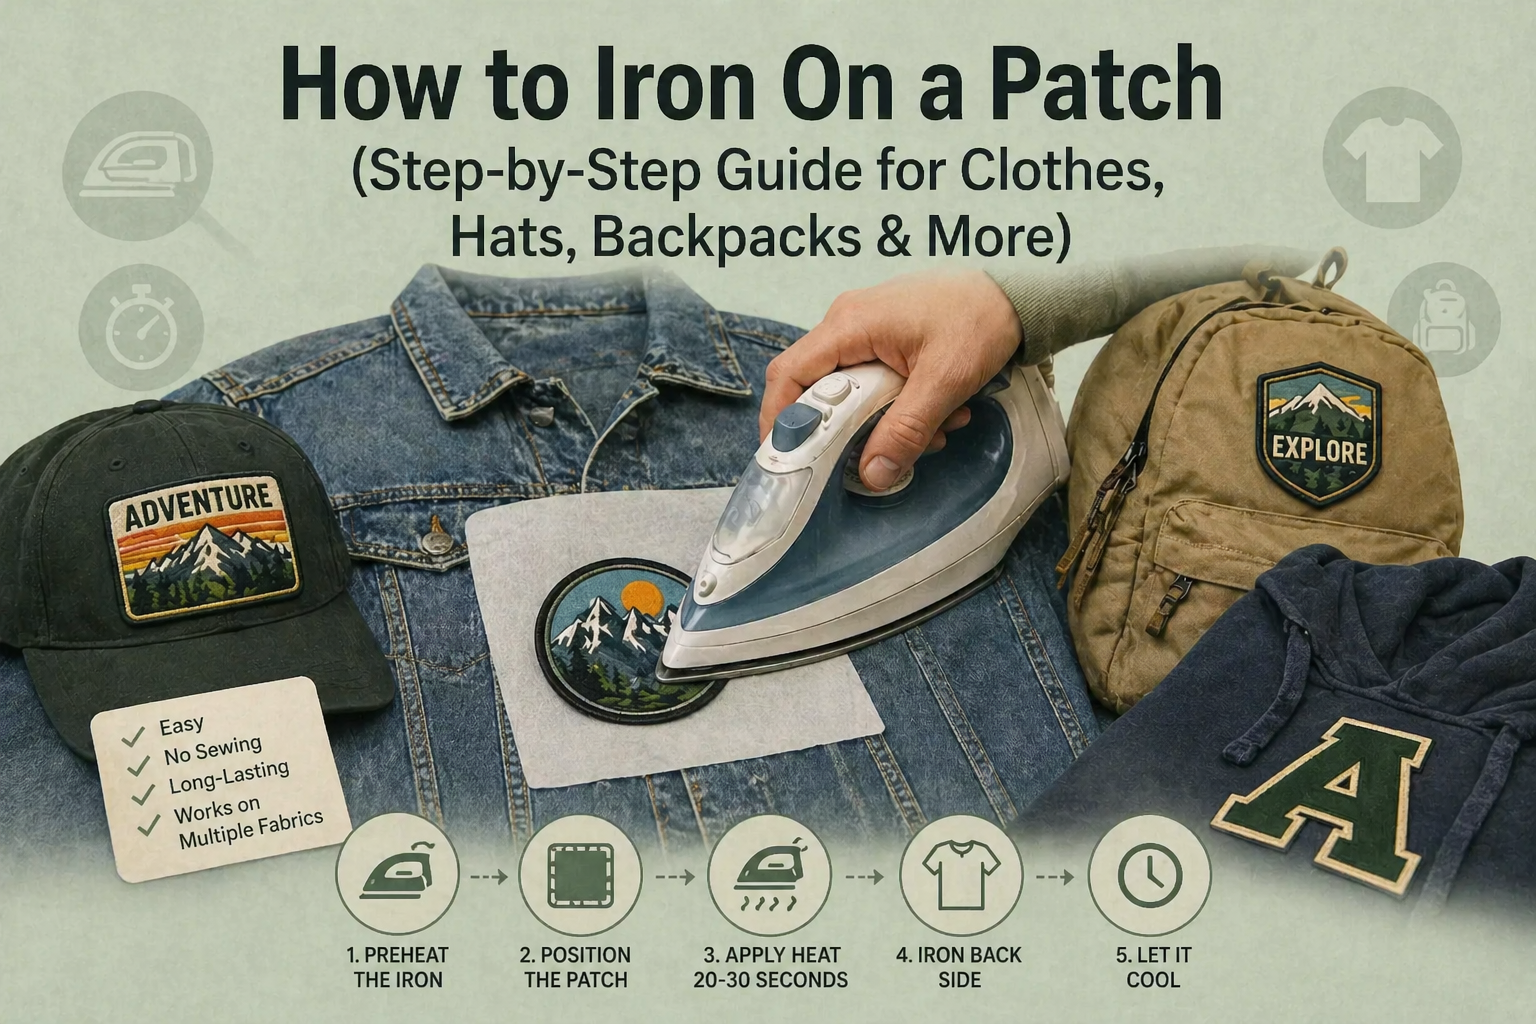
How to Iron On a Patch (Step-by-Step)
What You’ll Need:
- Iron
- Flat surface (ironing board or table)
- Thin cloth or parchment paper
- Your patch
Instructions:
- Preheat the iron: Set it to medium-high (cotton setting) and turn OFF steam
- Prepare the surface: Place your garment flat and remove wrinkles
- Position the patch: Place it exactly where you want it
- Cover with cloth: Protect fabric and patch
- Apply heat: Press firmly for 20–30 seconds
- Flip and repeat: Iron from the inside for another 20–30 seconds
- Let it cool: Allow adhesive to fully set
How Long to Iron On a Patch?
- Standard fabrics: 20–30 seconds
- Denim: 30–45 seconds
- Thick materials (jackets, backpacks): up to 60 seconds
How to Iron On Different Materials
1. Shirts & T-Shirts
- Works best on cotton
- Avoid stretchy fabrics unless reinforced
- Ideal for everyday customization
2. Polyester
- Use low heat to avoid melting
- Press longer instead of increasing heat
3. Jeans (Denim)
- Use high heat
- Apply pressure longer for strong bonding
4. Jackets & Hoodies
- Ensure flat surface underneath
- Double press (front + inside)
5. Backpacks
- Works if fabric is heat-safe
- Apply extra pressure due to thickness
6. Hats & Caps
- Tricky due to curved surface
- Use small iron tip or press section by section
7. Jerseys (Football, Baseball, Hockey)
- Use low to medium heat
- Avoid direct heat on synthetic fibers
How to Iron On Embroidered Patches
Custom embroidered patches works perfectly with heat- Always use a cloth barrier
- Press evenly to avoid lifting edges
- For long-term use, stitch edges after ironing
How to Iron On Patches WITH Plastic Backing
- Heat melts the adhesive backing
- Press firmly without moving the iron
- Let it cool completely before touching
How to Iron On a Patch Without an Iron
- Hair straightener – best for small patches
- Hot pan (with cloth barrier)
- Fabric glue – temporary solution
- Sewing – most durable alternative
How to Remove an Iron-On Patch
- Reheat with an iron
- Gently peel from one edge
- Remove leftover adhesive using:
- Rubbing alcohol
- Adhesive remover
Repeat the process for stubborn patches.
Common Mistakes to Avoid
- Using steam (prevents bonding)
- Moving the iron during application
- Not applying enough pressure
- Skipping backside ironing
- Using on heat-sensitive materials (like leather)
Can You Iron On a Patch on Leather?
Short answer: No. Heat can damage leather.
Instead:
- Use fabric glue
- Or sew the patch
Pro Tips for Long-Lasting Results
- Stitch edges for extra durability
- Wash garments inside out
- Avoid high-heat drying
- Wait 24 hours before washing
Final Thoughts
Iron-on patches are a quick, stylish, and cost-effective way to personalize your items—from shirts and jackets to backpacks and hats. With the right technique, they can last just as long as sewn patches.