

How to Attach a PVC Patch: Sewing, Ironing, and Velcro Application Guide
Custom PVC patches are built to last, but only if they are attached correctly. The method you use depends on the backing your patch came with, the surface you are attaching it to, and whether you want the attachment to be permanent or removable. Get it right and your patch will hold firm through years of use. This guide covers all three main attachment methods for PVC patches: Velcro, sewing, and iron-on.
Understanding PVC Patch Backing Types
Before you attach anything, confirm which backing your PVC patch has. The backing determines which attachment method applies.
Velcro backing (hook-and-loop)
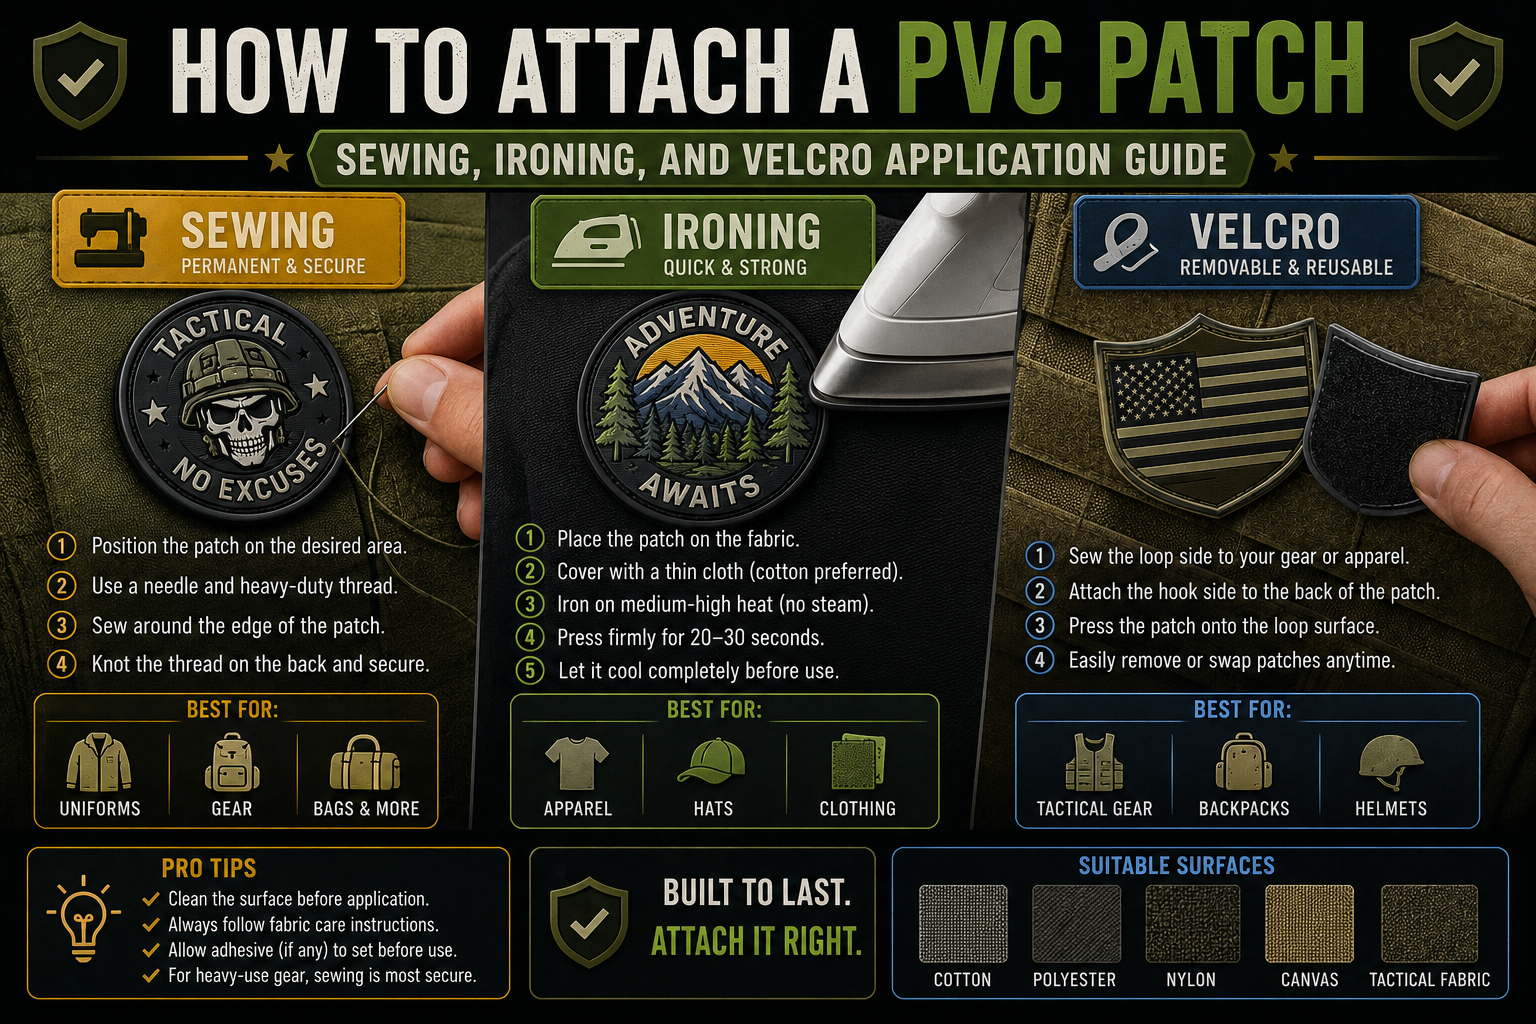
The patch has a rough hook side of Velcro on the back. It attaches to any surface with a loop field panel. This is the most common backing for PVC morale patches.
Sew-on backing
The back of the patch is flat PVC or has a fabric border, designed to be stitched directly to the garment or gear.
Iron-on backing
The patch has a heat-activated adhesive layer on the back. It bonds to fabric under heat and pressure.
How to Attach a PVC Patch With Velcro
Velcro is the easiest and most flexible attachment method. It allows you to add and remove the patch without any permanent modification to the gear.
What you need:
Your PVC patch with hook backing and a surface with a loop panel, or a separate piece of loop fabric to attach to your gear.
Step 1:
Identify the loop panel on your gear. Most tactical vests, plate carriers, hats, backpacks, and jackets designed for morale patches already have a loop field built in. If yours does not, you will need to add one.
Step 2:
To add a loop panel, cut a piece of adhesive-backed loop fabric to the size you need and press it firmly onto the surface. For a more permanent loop panel, sew it directly to the garment.
Step 3:
Press the hook side of your PVC patch firmly onto the loop panel. Align it carefully before pressing down, as the hook-and-loop will grip immediately on contact.
Step 4:
To remove the patch, peel it off from one corner with steady pressure. Velcro on PVC patches is durable and can handle hundreds of attach-and-remove cycles.
How to Sew a PVC Patch On
Sewing produces the most durable permanent attachment and is the best choice for gear that sees heavy use, washing, or field conditions where Velcro is not practical.
What you need:
A needle appropriate for the material, heavy-duty thread, a thimble, and optionally a sewing machine with a heavy-duty needle.
Step 1:
Position your PVC patch exactly where you want it on the garment. Use a fabric pin or small piece of masking tape to hold it in place temporarily.
Step 2:
Thread your needle with heavy-duty thread. A doubled thread is recommended for better grip and durability.
Step 3:
Begin sewing around the perimeter of the patch, passing the needle through the fabric of the garment right at the edge of the patch. Keep stitches close together, no more than 3 to 4 millimetres apart, for a secure hold.
Step 4:
If your patch has a fabric border, sew through it directly. If it is flat PVC to the edge, sew as close to the edge as possible and keep stitches tight.
Step 5:
Knot the thread securely on the inside of the garment when you have completed the perimeter. For extra security, add a second row of stitches inside the first.
Tip:
Use a sewing machine with a heavy-duty or denim needle if you are working through thick material like canvas or leather. PVC is not flexible enough to sew through directly in most cases, so your stitches should always go through the garment fabric at the patch edge rather than through the patch itself.
How to Apply an Iron-On PVC Patch
Iron-on PVC patches have a heat-activated adhesive on the back. This is a faster method than sewing but produces a less permanent bond, particularly on materials that flex or stretch regularly. Best for lighter use applications and stable fabrics.
Note:
Confirm your patch is designed for iron-on application before proceeding. Standard PVC patches without a heat-adhesive backing will not bond correctly under heat and may be damaged.
What you need:
A household iron, a thin pressing cloth or piece of cotton fabric, and a flat hard surface.
Step 1:
Pre-heat your iron to a medium-high setting. Do not use the steam setting as moisture can interfere with adhesive bonding.
Step 2:
Place your garment flat on an ironing board or hard surface. Smooth out any wrinkles in the area where the patch will go.
Step 3:
Position the patch adhesive-side down in the correct location. Place your pressing cloth over the patch to protect the PVC surface from direct iron contact.
Step 4:
Press the iron firmly and evenly over the patch for 30 to 60 seconds without moving it. Apply consistent downward pressure. Do not slide the iron back and forth.
Step 5:
Lift the iron and allow the area to cool completely before touching or moving the garment. This allows the adhesive to fully set.
Step 6:
Once cool, test the edges of the patch by pressing gently. If any edges are lifting, repeat the heat application on those areas.
For best results, sew around the perimeter of the patch after ironing. Iron-on adhesive alone may not hold permanently through repeated washing and flexing. Combining heat bonding with a perimeter stitch gives you a bond that is both strong and durable.
Caring for Gear With PVC Patches Attached
Sewn patches:
Machine washing is generally safe. Turn the garment inside out and use a gentle cycle to reduce stress on the stitching.
Velcro-attached patches:
Remove the patch before washing the garment when possible. If washing with the patch in place, close the hook-and-loop to prevent it from catching on other fabrics.
Iron-on patches:
Hand washing or a delicate machine cycle is recommended. High heat and agitation can weaken the adhesive bond over time.
Final Thoughts
Attaching a PVC patch correctly takes only a few minutes but makes the difference between a patch that holds for years and one that peels away after the first wash. Match your attachment method to your backing type, take your time with the application, and your patch will stay exactly where you put it. If you are ordering custom PVC patches and want to choose the right backing for your application, explore all backing options at Patch Makers Hub. Free design help, free mockups, and fast worldwide shipping on every order.